

How To Make A Drum Set Sound Better
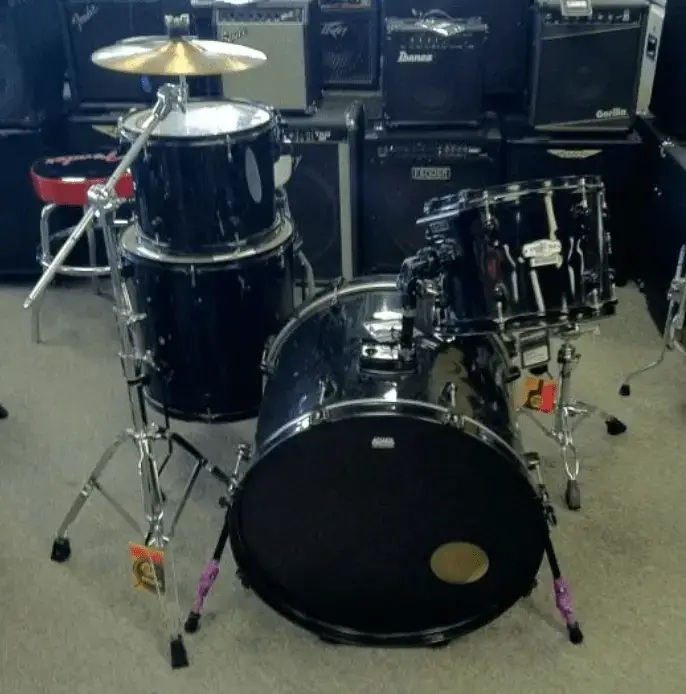
I too was once a beginner and I too once endemic the cheapest, cruddiest pulsate kit you could imagine. After years of fiddling with my ain gear though and helping dozens of students get the most out of their cheap pulsate sets, I have a few pointers on how to get the most out of every kit.
What follows are 12 Ways to Brand Cheap Drums Sound Better:
- New Drum Heads
- Tighten All Internal Hardware
- Audit and Wax the Begetting Edges
- Check For Drum Head Fit
- Melody Your Drums Properly
- Strategic Muffling
- Invest in Decent Cymbals
- Add together a Bass Pulsate Port
- Experiment With Bass Drum Beaters
- Experiment with Sticks
- Adjust Your Snare Wires
- Hardware Adjustments – Eliminate Those Rattles
So, are you ready to brand your kit audio great? Follow forth as I guide you through each ane of these steps in item. Hither is a listing of supplies yous will need in order to successfully complete every step:
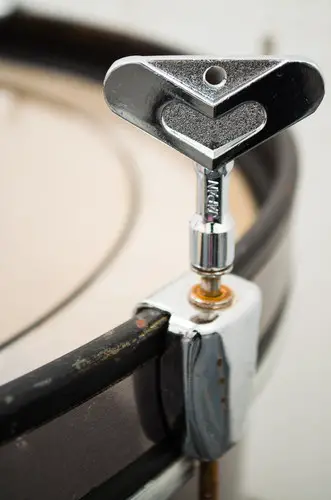
- Drum Key
- Fresh Drum Heads of Your Choice
- Beeswax
- Bass Drum Port Hole Reinforcement Ring
- Drum Tuner (optional)
- New Bass Drum Beater (optional)
- Philips and Flat Head Screwdrivers
- Pliers – Needle Olfactory organ Should suffice
1: New Pulsate Heads
A lot of times, in that location is no telling how long a set of drum heads have been on a kit. If you meet a ton of scuffs and dents on them though, it's a off-white assumption that information technology'south been a while since they were inverse out.
Quick Tip:
Ane quick way to see just how damaged and fatigued a drum head is is to remove all tension from the head past loosening all of the tension rods. If the drum caput retains information technology's smooth, flat surface and then it is a relatively fresh caput. If the centre of the drum caput sags severely or massive dents and dings appear, this is an indication that this drum head has seen A LOT of use and is overdue for a change.
Even if there is no credible harm to a drum caput, if information technology has been on a drum for a long fourth dimension information technology is a safe bet that the resonance of that pulsate head has been negatively affected.
Therefore, when you're buying a used pulsate gear up, commonly the commencement go-to method for improving the sound of a drum set is to supplant its drum heads. If you are unsure of what size drum heads to purchase for your new-to-y'all drums, y'all'll want to measure the diameter of the beat out itself (not including the hoop installed on the pulsate) and circular to the nearest inch.
A typical v piece drum set will have pulsate dimensions of 14″ for the snare, 12″, xiii″ and 16″ for the toms and 22″ for the bass pulsate, although this can vary greatly depending on the blazon of drum set y'all've purchased.
Next, nosotros'll discuss some things y'all can do while you have the drum heads off to improve the sound of your new kit.
two: Tighten All Internal Hardware
OK, yous've removed the onetime drum heads from your shells. This is a PERFECT fourth dimension to inspect and tighten all of the internal mounting hardware for the lugs and other items bolted to the shell (similar tom mounts, air vents, snare throw-offs, etc.).
Near screws which adhere hardware to drums have washers on them which, if loose can cause an audible rattle when the drum is played. For this procedure, you'll near likely only need a philips head screw driver, though on some older drums a flat head or socket head mode screw was used.
Go around to each spiral and tighten information technology merely so it has a bit of friction. You never want to over-tighten this hardware equally this tin can impact the resonance of your beat out.
Quick Tip:
This is an excellent time to check out your lugs equally well to brand certain that no threads are stripped and that the gaskets located betwixt the lug and the shell are in tact. If whatever of them need to exist replaced, getting those replacement parts can be challenging however there are plenty of drum parts suppliers out there which can assist you.
Air vents/grommets are typically easily tightened using a pair of pliers. The same rules regarding over-tightening apply. Don't exercise it!
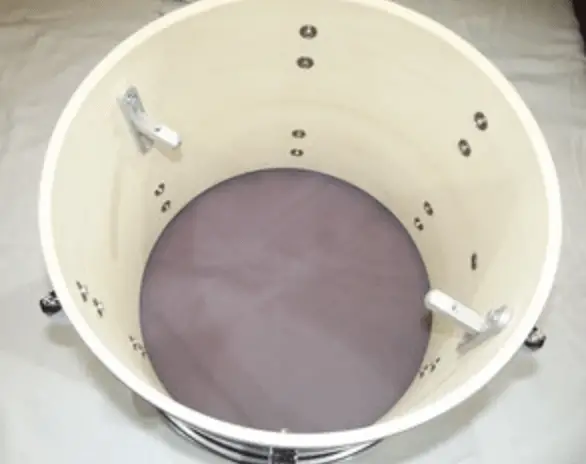
3: Inspect and Wax the Bearing Edges
INSPECTION:Bearing edges are mysterious creatures that have needlessly baffled and intimidated many drummers. While issues with bearing edges are tough to gear up – inspecting them couldn't be easier, specially if you've already removed the drum heads.
- Run your finger along the border and experience for whatsoever divots, dents or bumps. You're looking for your finger to travel smoothly all the manner around the diameter of the beat out. If y'all practise encounter a flaw, go in for a closer inspection.
- Become downwardly even with the bearing edge and then that y'all can view the entire plane at once (i.due east. you can see if the edges are even with each other).
- If y'all desire to get really fancy, go find yourself a shine, apartment and level surface and identify the drum down on it. Using a flashlight in the crush, inspect the edges from the outside. There will probable be a little fleck of calorie-free escaping from the bottom – but the key is that yous are looking for the light to be Even all around the drum. Any brighter spots could point to bearing border damage.
- One acceptable exception to this inspection would exist the bottom side of a snare drum, which has "snare beds" cut into the bearing edges. These are slight indentations in the opposite sides of the edge where the snare wires run and let them to freely rattle.
- Repair: Very small issues can commonly be fixed with a fleck of wood filler and sand paper, but this must be done very carefully. It's usually best to call upon a local drum architect/repair store to fix issues with edges as they will likely demand to cut an entirely new edge into that side of the pulsate.
WAXING:This sounds like a tricky functioning, but it really isn't. Applying a pocket-sized amount of wax to a drum'southward bearing edge allows for better tuning and vibration characteristics of the drum head.
Whatever y'all do, please don't melt any kind of wax for this. You'll simply want to acquire some bees wax (though a candle or paraffin would work in a compression) and apply a small amount to the bearing border, being careful not to crusade any harm to it in the procedure.
four: Check For Drum Head Fit
Next, you will want to double bank check that the "collar" of your new drum heads (the firmer, rounded edge of the drum head flick) fit nicely over the bearing edge of the drum. The most obvious reason for this is to check and make certain you lot've bought the right size drum head, however there are a few more potentially problematic reasons for a bad fit:
If your shells are "out-of-round" or not perfectly round, it is quite probable that your drum head either flat out won't fit or it won't "seat" properly over the border. Unfortunately, there isn't much that can be done to save severely out-of-round shells. Simply place the new head over the pulsate and visually audit that all edges marry nicely with each other around the diameter of the instrument.
Vintage Drums (for the sake of this commodity, allow's allocate this as drums built prior to the 80's) tend to take thicker shells and slightly larger circumferences. If your new head doesn't fit properly, a bit of experimenting is in shop for y'all as not all drum head brands are created equal and some may fit better than others. Quick Tip:Instead of buying a whole bunch of drum heads online, go to your local drum/music shop and have i of the sales folks work with you in trying the fit of different brands.
Pulsate Covering can significantly add to the circumference of a beat out, specially in older drums. If this is the case, yous may demand to trim back some of the drum roofing to get the head'south hoop to fit over the drum properly.
Once you've completed all of these steps, it'due south time to re-install the hoops and hand thread the tension rods through the hoop into the lugs.
5: Melody Your Drums Properly
It is safe to say that tuning drums properly is an art from unto its own, which is why I have dedicated an entire section of this website to the topic of drum sounds and drum tuning. I have and will be adding tons of useful content and guides to that department for how to properly tune drums AND Besides how to achieve specific drum sounds.
For the sake of this article all the same, I'll give y'all a condensed version of tuning best practices which yous can follow:
- Beginning by finger tightening all tension rods effectually the drum on both top and bottom heads.
- Someday y'all tighten these rods (either past hand or with a tool), you lot'll want to apply a 'star' pattern to ensure you are distributing the tension evenly around the drum.
- Once all tension rods have been paw tightened, start by tuning the bottom head:
- In the star design, give each tension rod a ane/4 to 1/2 turn
- Repeat until the wrinkles in the head have just disappeared
- At this point, you lot should hear some sort of audible pitch from tapping the head
- Get effectually the caput and tap (with your pulsate key) information technology in close proximity to each tension rod.
- Your goal is for each rod location to accept the same pitch, and then suit after each tap until all tension rod locations sound the same.
- Repeat the above process for the acme head
- Note: the lesser caput is usually tuned to a higher pitch than the tiptop head
- If y'all want to get actually fancy – you tin attempt to lucifer the resonant note of your drum shell (the annotation you lot hear when yous tap your crush without heads on information technology) to the note you're tuning the drum to. This is a pretty avant-garde technique though.
Once again, a bit low-cal on the details but I've offered a lot more in-depth content in the sound and tuning section of this site. Suffice it to say that proper tuning is an art form and takes practice. At that place are also MANY opinions on proper tuning technique, pitches, etc.
6: Strategic Muffling
Muffling is definitely a personal preference and in my opinion, is often overdone but remains a solid tool in your belt for getting drums to audio the way yous want them to.
Bass Pulsate: Virtually folks accomplish for pillows and blankets to stuff inside their bass drum, which works perfectly well. Make sure to play effectually with how much the muffler contacts the batter and resonant heads, every bit a slight modify can accept a HUGE touch on on the sound of the kicking pulsate. I personally similar to utilize a thin pillow which barely touches the concoction side head just touches the resonant caput a bit more.
Snare Drum:In nigh cases, I recommend letting the snare drum sing! On occasion, I accept been known to take my wallet out of my dorsum pocket and stick information technology on the border of the drum to cut down on some of the ring and overtones. This is particularly the case in low volume scenarios or with a metallic shell snare drum. Getting a fix of O-Rings is a peachy way to control the overtones (and to keep your wallet from getting stolen at the gig). They just plop neatly on height of the drum head and usually do the fob.
Toms: This is usually where drummers tend to fiddle around the nearly as there are so many different sounds y'all can go for with your toms. A well tuned tom with the correct heads might not need whatever muffling at all as a nice sustaining pulsate (peculiarly flooring toms) can be quite pleasing. Using O-Rings, moon gel or fifty-fifty a patch of Kleenex with gaffer tape can help cut downwards the sustain and overtones. A lot of drummers forget about the lesser/resonant heads though, which is where a lot of the sustain comes from.
7: Invest in Decent Cymbals
"You get what you pay for" is a phrase which holds especially true when information technology comes to cymbals. Nearly cheap, beginner pulsate prepare actually come with a gear up of cymbals, however these instruments might equally well be used for trash tin can lids as they are non durable (y'all will warp them – guaranteed), and they also sound about as adept as trash can lids do.
Cipher makes a decent sounding drum set sound worse than horrible sounding cymbals.
The reason I chose the word 'invest' for this heading is because cymbals aren't mostly inexpensive. But anything is usually better than what is included in beginner drum sets. Nearly major cymbal manufacturers (Zildjian, Sabian, etc.) seel 'starter sets' which typically consist of a set of hi hats, a crash cymbal and a ride cymbal. A good example of this is the Zildjian ZBT Starter Set which you can pick upwards for just over $200. These are definitely non the creme de la creme of cymbals, however they are durable and sound decent for the money.
As with nearly things in this commodity, in that location is no replacement for heading to your local pulsate shop, grabbing a stick and trying out various cymbal makes and models. You volition quickly learn what blazon of sound you gravitate towards.
8: Add together a Bass Pulsate Port
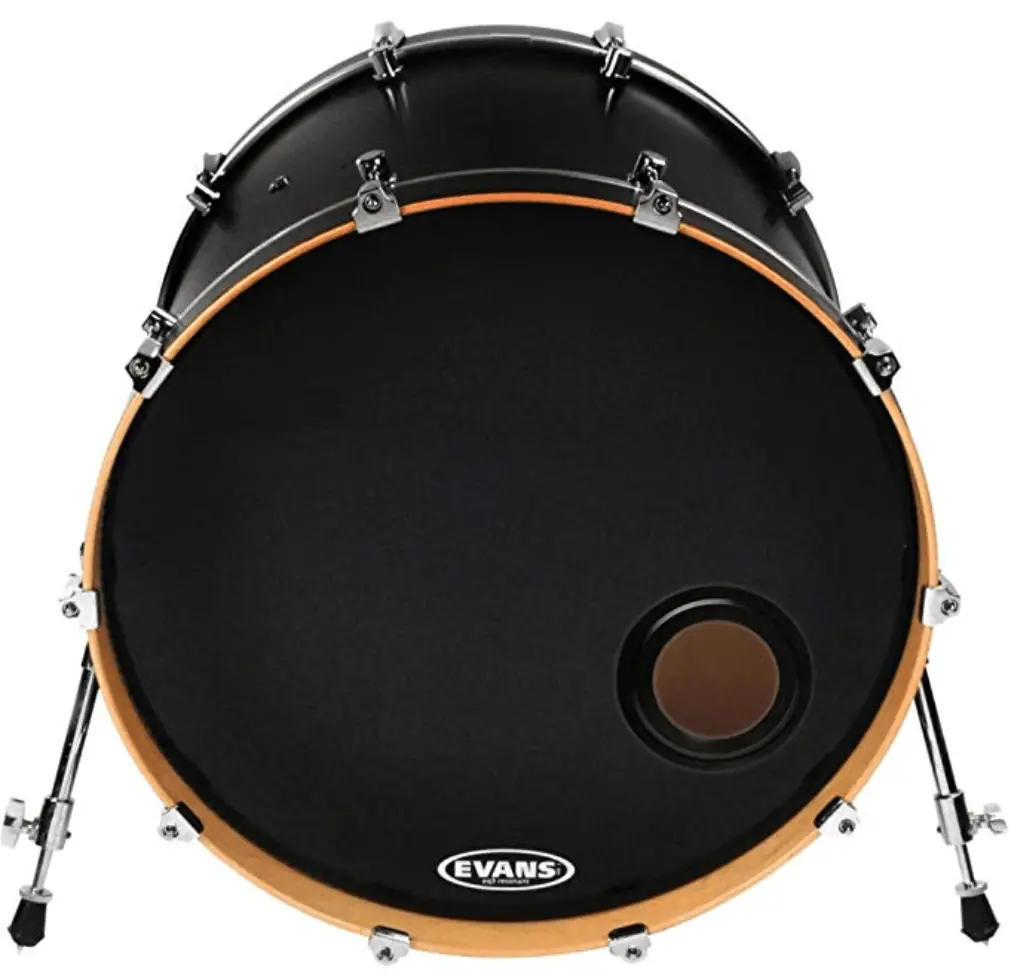
If a bass pulsate is not sufficiently vented, it volition likely be very resonant and sound a bit like a basketball. Furthermore, the response from your bass drum pedal will also be very 'alive'.
It is very common place for most drummers to add a pigsty (or port) to the front, resonant bass drum head. This accomplishes several things:
- Sufficient Venting – Air is immune to freely escape the pulsate, allowing the drum heads to resonate freely without air pressure level interfering
- Muffling – Because of the ventilation, the pulsate will naturally not be quite as resonant and produce a punchier sound.
- Microphone Placement – It is common for sound engineers to stick a microphone inside of the bass pulsate. Having a port in the front head allows for this to be done hands, without necessitating the removal of the front head.
9: Experiment with Bass Drum Beaters
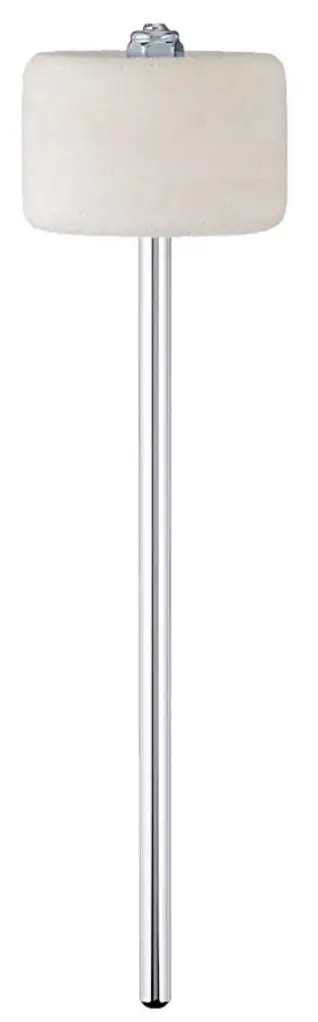
At that place are diverse weights and materials to play with when it comes to bass drum beaters. All beater shafts are universal, meaning that you can easily bandy different manufacturer'south beaters into your existing bass drum pedal. The most common materials used for bass drum beaters are (in society from softest to hardest):
Felt: The classic beater is made of felt and provides a soft, smooth attack which focuses the sound of the bass drum more than on resonance.
Wood: These beaters are non very common but provide a flake more set on while still retaining the warmth of felt.
Plastic: This material is incredibly durable and is popular with a lot of heavy hitters equally it also provides clear assail.
Acrylic: This is essentially the opposite end of the spectrum equally acrylic is a pretty hard fabric and results in a very brilliant and sharp attack.
Double Sided: In that location are several beaters out in that location which are double sided, assuasive you lot to switch to a different material depending on what type of gig you're going to exist playing.
Quick Tip:
You'll often see drummers affix a kevlar sticker to the batter bass drum caput, correct where the beater makes contact with it. This not only provides some reinforcement for the drum head itself and prolonging its life, simply information technology also has some affect on the sound resulting in more than attack when the pulsate is played.
As y'all can see, there are a lot of options hither and like with everything else, experimentation is key…and also quite fun!
10: Experiment with Sticks
While the sticks themselves make some difference in audio, the stick tips are probably going to take a bigger impact on the audio of the drums…and fifty-fifty more and so…the cymbals. The two main options here are woods tips or nylon tips.
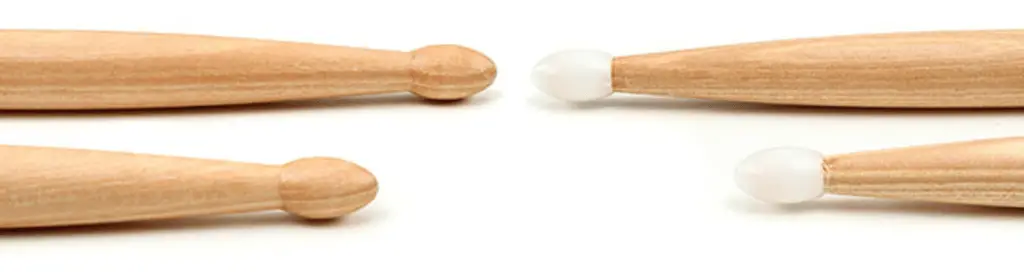
Wood tips are only an extension of the stick itself and are formed as part of the lathing procedure for the stick. They produce a very natural, perhaps somewhat muted sound when used.
Nylon tips are oval shaped nylon sleeves which are slid over and glued to the cease of the stick. Nylon tips produce a much brighter audio, primarily because the fabric itself is a trivial fleck harder.
One downside to using sticks with nylon tips is that they have a trend to leave marks on cymbals and drum heads. Additionally, if the nylon tip comes off during play, the wood underneath is probable more than dowel shaped and tin can actually inflict some damage to your heads.
eleven: Adjust or Replace Your Snare Wires
If your snare drum is old and the pulsate heads are worn out, it is a safe assumption that the snare wires (or merely called snares) probable haven't been replaced in a long time, maybe never. While these tend to be more durable than a drum head, some attending here could make a decent sounding snare into a great sounding snare!
A great indication for the condition of your snares is to simply plow your throw-off off and wait at the wires in a slackened country. If the individual strands are obviously damaged, bent or crossing each other – it's high fourth dimension for a new set.
As with anything, there are a wide range of snares bachelor on the market place with a wide variety of price points to match. But like with drum head fit, I would recommend trekking to your local pulsate shop which is likely to have a decent selection of snares bachelor. They will definitely exist able to suggest you on the best ready of snares for the sound yous are going for.
Alternately, if you're non too picky but recognize the need for a new set and just want a recommendation, Gibraltar makes some skilful basic snare wires available for nether $10. A slight step upward might be a set of wires from PureSound which run in the mid $xx range.
12: Hardware Adjustments – Eliminate Those Rattles!
Cymbal stands, snare stands, drum thrones, hi hat stands and bass pulsate pedals all of a lot of adjustments and moving parts. To eliminate excess noise on your kit, make sure that all adjustments have been made and tighten whatever wing nut or screw yous run into.
Some hardware also have dissever memory locks on them so that it can 'call back' how the hardware was configured later you've taken information technology autonomously and collapsed the stand. These tend to exist likely suspects for excess rattling.
Related Questions
How do I make cymbals sound better? In short, cheaply fabricated cymbals volition never sound as good as their inexpensive counterparts. If that isn't an pick, ensure that they are mounted correctly with plenty of felt, and adapt your playing technique to brand certain yous are getting the nigh resonance out of the instrument as possible. I wrote a detailed article well-nigh this exact topic if yous want to get more than detailed information.
How can I make my drums quieter? There are many methods to doing so including various muffling solutions (both gratis and products yous can purchase), likewise as soundproofing the environment yous are in and then that audio doesn't escape the room yous're in as much. I have a whole section of this website devoted to this topic, so dig into those articles to become more details.

How To Make A Drum Set Sound Better,
Source: https://pickmydrumset.com/make-cheap-drums-sound-amazing/
Posted by: woodberryandever.blogspot.com
0 Response to "How To Make A Drum Set Sound Better"
Post a Comment