

How To Do A Mud Set Shower Pan
Your bathroom's flooring has a shower pan that is waterproof and collects h2o then directs it to the drain. The shower pan needs to be installed correctly to support the weight of the users and keep the underlying layers from damage by the water. The right mortar mix for the shower pan determines how good the pan will be. If you make a fault with this one, you risk destroying the whole shower floor.
The best mortar for shower pans is a mixture of sand and Portland cement as it creates a water-resistant barrier that can support the weight of the shower unit and the users. You lot tin create your ain with Portland cement and fine sand (ane:5) and 4 quarts water for 80 lb. of the mixture.
What mortar to use for shower pan
Mortar is preferred for shower pans over other options such as physical and cement given that it bonds better to other surfaces and is more than moldable. The best mortar mix for shower pans contains sand and Portland cement. This will create a water-resistant barrier that will support the weight of the shower floor and its users.
| Types of Mortar | Ingredients |
| Quikrete Floor Mud | Portland cement, graded sand, other components |
| Quikrete Sand/Topping Mix | Portland cement, commercial form sand, other ingredients |
| Sakrete Sand Mix | Portland cement, concrete sand |
| DIY Shower Pan Mortar Bed | Portland cement, fine sand |
At that place are three master types of mortar for shower pans every bit follows:
1. Quikrete Floor Mud
The Quikrete Floor Mud is a concrete mix manufactured by QUIKRETE which is fix for use in creating shower pans, slate, travertine, and marble flooring tiles. When mixed with water, it creates a smooth and water-resistant surface which is ideal for shower pans.
Y'all don't need to calculate whatsoever of the ingredients with the Quikrete mortar mix for shower pans since they have been calculated for y'all. Just pour the mix into a container then add water (4 quarts for each 80 lb. bag) before applying information technology to the shower floor.
The benefits of using Quikrete Floor Mud include the fact that y'all tin use information technology both indoors and outdoors, you don't need to summate the parts, information technology provides a strong result (5000 psi compressive strength in one case fully cured), and is easy to form the desired shape of the floor. The simply downside is that it'south not easily bachelor.
How long should mud bed cure before tiling?
A mud bed needs to cure for at least 28 days earlier tiling. This ensures that it'southward waterproof and has the required compressive forcefulness to retain its shape and integrity when in utilize.
How many bags of mortar for shower pan?
It depends on the size of the shower floor. As long equally the floor has betwixt two and iii inches of thickness at the thickest places and at least 2 inches of thickness at the thinnest, it volition be enough.
2. Quikrete Sand/Topping Mix
This sand topping mix for shower pans, also by Quikrete, is made from a mix of Portland cement, commercial course sands, and other components. Unlike Quikrete Floor Mud whose ingredients are consistent, the corporeality of water needed for the Quikrete Sand/Topping Mix depends on the components used to form it. The manufacturer will always betoken that on the numberless.
3. Sakrete Sand Mix
Sakrete Sand Mix is made of Portland cement and concrete sand and is a popular alternative to the above options from Quikrete. Likewise the shower pan, information technology tin be used for walks, steps, and leveling floors both indoors and outdoors.
4. DIY Shower Pan Mortar Bed
Y'all tin can make your own shower pan concrete mix using sand, cement, and water. Mix 1 function of Portland cement with five parts of fine sand. For every 80 lbs. of this mix, add together 4 quarts of water.
Your ain shower base mortar might seem like a cheaper option just it'southward commonly not as practiced as the commercial alternatives. Both Quikrete Flooring Mud and Quikrete Sand/Topping Mix don't cost much yet they're easier to work with and provide better results than DIY options.
Shower pan mortar consistency
All the shower flooring mortar mixes above need to have the aforementioned consistency to obtain the best results. In one case mixed, you should exist able to form a ball with the mix in your palm. The ball should hold its shape just release some h2o when squeezed.
If the brawl collapses on its ain, it'south too moisture and you should add more of the dry mix. If information technology retains its shape simply doesn't release water when squeezed or crumbles autonomously, it'due south too dry out and needs more h2o to exist added.
Shower pan mixes: comparing
| Quikrete Floor Mud | Quikrete Sand/Topping Mix |
| Affordable – $7 per lxxx-pound handbag | Slightly costlier – $8 per eighty-pound bag |
| A bit hard to discover | Easily available |
| Available in 80 lb. bags | Available in numberless of 10, xl, threescore, and lxxx pounds |
| Piece of cake to use | Easy to apply |
Shower pan material
Once y'all lay the mortar bed for your shower, the shower pan you lot install on peak tin exist made from the following materials:
Acrylic
An acrylic shower pan is made from modified plastic under pressure and heat to form a single piece that'due south big enough to fit your bathroom floor.
Tile
While tile is highly attractive, it likewise requires a lot of skill and intendance to ensure it provides a waterproof seal for the remainder of the floor. It also requires maintenance on a regular basis to maintain its integrity. When installing tiles as the shower pan, ensure the mortar bed is at least 2 inches thick on the outer edges of the floor and it reduces towards the shower bleed to allow water to menstruum to the drain.
Fiberglass
Fiberglass shower pans are created from polymer reins which have been strengthened with woven drinking glass fibers. Although cheaper than the alternatives, they're more than likely to get scratches and stains.
Composite materials
A combination of unlike materials tin can exist used to create a shower pan whose qualities will depend on the materials used. For example, acrylic tin be strengthened with fiberglass to make a better shower pan than the individual materials.
For the preformed shower pans such as those made from fiberglass, acrylic, and composite materials, the manufacturer needs to provide the thickness needed for the pan to perform correctly.
When installing all of these types of shower pans, follow the EPA's guidelines on moisture control on buildings to ensure there's no h2o leaking into the remainder of the building when yous're done.
How to install a mortared shower pan
For this practise, you lot need premixed mortar, drill, paddle, drill screw attachments, forest screws, saucepan, pipe wrench, level, silicone, waterproof membrane, pocketknife, waterproofing membrane, and metal lath. Make sure the plumbing is already carried out and the shower has a shower drain and a bleed trap earlier installing the shower pan. Your shower needs a P-trap to keep sewer gases out of the business firm.
Install the mortared shower pan as follows:
one. Frame the shower stall
Cull an area for the new shower stall making sure the drain has been cut out. If the subfloor is shaky, replace it with a ¾-inch piece of outside plywood. Use pressure-treated forest planks to create the bottom plates for the shower stall.
The studs for the walls should be centered on the lesser plates at intervals of 16 inches. Use 3-inch decking screws to fasten the bottom plates to the floor. Support the sides of the membrane with 2×10 toenail blocking between the studs.
Use 3 force per unit area-treated planks of wood at 2×4 inches to class the curb of the bath.
You can skip this step if yous are reinstalling the shower pan in an old bath constructing a new shower pan in a bath.
2. Coat the lower side of the bleed with silicone
Apply silicone beads to coat the within and exterior of the bolt circle of the drain on the floor.
3. Coat the drain with cement and PVC primer
Coat the inside of the bleed with cement and a PVC primer then twist the drain onto the waste material line in the floor. After the cement has dried upwards, insert the drain bolts into the lower bleed plate. Exit almost ¾ inches of the bleed bolts exposed.
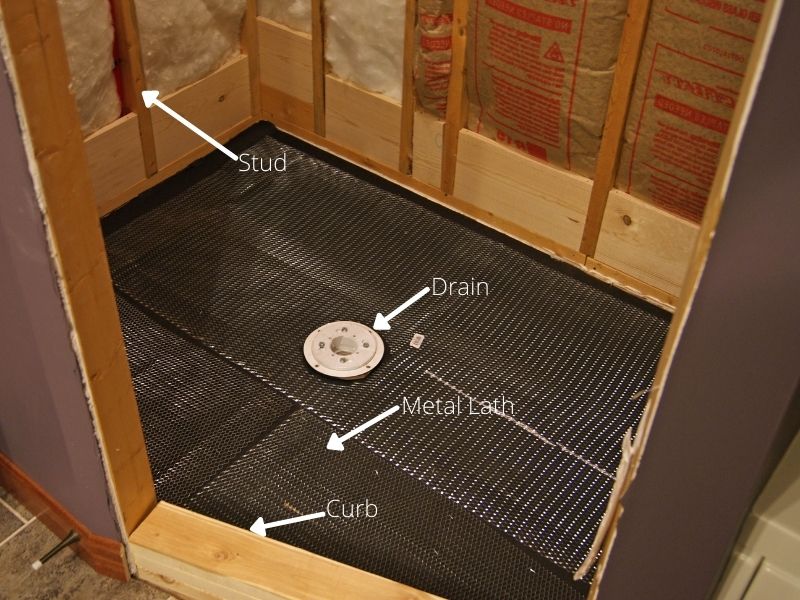
4. Cut and fit the metal lath and felt to the flooring
Measure out the size of the shower floor then cutting a 15-pound piece of felt to fit this size. Place it on the floor then staple information technology in identify. Using the same measurements, cut a metal lath and then also staple it on the flooring. Make certain there are no bumps on the lath and felt. The metallic board provides a foothold for the mortar mix.
Next, cut a round hole around the bleed hole. The pigsty should be at least an inch wider than the size of the hole to let for the side by side steps.
5. Mix and apply dry deck mud
Follow the instructions on the mortar mix to mix enough for the whole bathroom flooring. Use a latex additive to mix the dry deck mud instead of water. Plug the drain hole with a piece of textile and then pour the mix onto the floor. Evenly spread information technology out with a wood bladder then allow it to dry out overnight.
six. Mensurate and apply the waterproof membrane
Measure out the waterproof membrane such that it'due south ix inches larger than the floor on the sides and xvi inches larger on the adjourn of the bath flooring. Y'all tin can make larger pieces of the waterproof membrane by solvent-welding pieces together. The surface area around the drain should exist reinforced by solvent-welding some other slice of the membrane on the original ane (nearly 10 inches in bore).
Lay the membrane onto the flooring, smooth out whatever air bubbling in it then staple information technology onto the floor to secure it. Do the same for the excess parts of the membrane which will rise up on the wall and curb. Solvent-weld the pieces so staple them to the wall and adjourn.
7. Mark and cut out the bolts around the drain
Feel the flooring over the membrane and then mark with an Ten over each commodities effectually the drain hole. Use a precipitous knife to cut an 10 over the bolts to betrayal them. Unscrew the bolts in readiness for installing the upper drain plate.
8. Cut the membrane and install the upper drain plate
Feel the area between the bolts then cutting out the drain hole exactly effectually the hole and no larger. Place the upper bleed plate into the pigsty making certain it aligns with the screw holes effectually it. Spiral the bolts to secure the drain plate over the drain hole.
9. Check and fix leaks
Plug the drain pigsty then fill the shower pan with water iii inches deep then wait for 24 hours. If the water level is the same, your pan is watertight. If not, information technology would accept leaked either through a loose drain pigsty, punctures in the membrane, or the sides.
Tighten the drain pigsty bolts and so fix any punctures using a patch of the membrane and mucilage. For the sides of the shower floor, solvent-weld the membrane to the wall then wait for the solvent to dry out upwards.
Test for leaks once more.
x. Install a strainer on the bleed
Wrap Teflon tape (plumber's tape) effectually the threads of the strainer so screw information technology into the drain pigsty'south flange. Cover it with masking tape to protect information technology from thinset and mortar in the side by side steps.
11. Add a waterproof membrane
Use a waterproof membrane on the wall of the bathroom such that it covers at to the lowest degree three inches of the membrane from the floor and parts of the wall.
If the bath volition be made of wooden walls, make certain the whole of the wall is covered in this waterproof membrane. For bathrooms with glass or physical walls, a pocket-size layer of the waterproof membrane is enough.
12. Cut and install the backerboard
Cut backerboard to the size of the walls then place it on shims ½ inches in size then spike the screws to the walls with backerboard screws. The screws should remain at the top inch of the flooring membrane to reduce punctures which may lead to leaks.
One time the backerboard is screwed into place, remove the shims then make full the areas at the bottom with caulk and thinset.
13. Apply mortar and a metal board
Marking on the walls with a pencil three inches from the floor. Measure the distance from the walls to the drain hole so summate the gradient to ¼ inches for every horizontal foot (1ft). Apply a layer of mortar followed by a metal lath and another layer of mortar while maintaining the slope towards the drain.
14. Lay the floor tiles
Afterwards the mortar is dry out (overnight), scrape off any bumps and imperfections on the floor so evenly spread a layer of thinset on it. Press the tiles into the thinset in line with the slope of the bathroom. Smaller tiles are better at befitting to the slope of the bath than larger ones. Let the tiles cure overnight then apply grout in-betwixt the tiles and around the edges where the tiles see the walls.
After the grout is dry out, install the shower console and the other parts of the shower equally required. Learn how to make clean a shower stall to go on it in good shape.
Source: https://highshower.com/mortar-for-shower-pan/
0 Response to "How To Do A Mud Set Shower Pan"
Post a Comment